Desktop Support
Calling the Help Desk
We can be reached at (734) 994-8100 x 1286. The phones are manned M-F; 7:30 a.m. to 4 p.m. Voicemail is monitored 24/7.
Customers requesting support, who are not employees of WISD, should still call the Help Desk number. If we can help you, we will.
How To
Google Apps for Education
WISD has Google Apps for Education available for all Agency staff!
The Technology department has created a Google Apps account for each staff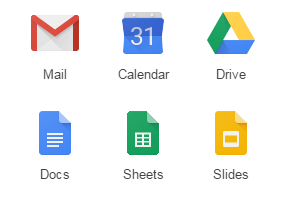 member. This means you now have both an Office365 and Gmail account. This will allow you to function within Google Apps for education with your Gmail account safely and securely, in addition to using the Microsoft office suite and outlook through your Office 365 account.
Basic Account Information:
- Both accounts have the same login ID (first initial + last name)
- Your WISD Office 365 account ends with the @washtenawisd.org domain
- Your WISD Agency Gmail account ends with the @washisd.net domain
Do both accounts have the same Password?
No, You will need to reset your Active directory/computer login password to sync the two accounts. Please follow the steps:
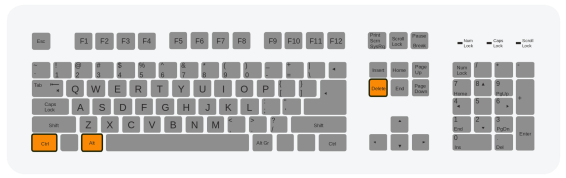
- Press the CTRL, ALT DELETE keys on your keyboard at the same time.
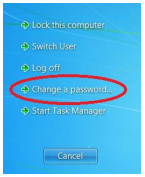
- Your Windows background will change and you will be presented with a few options. Please click on “Change a Password….”
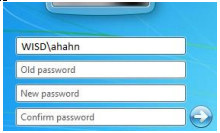
- You will then be prompted to type in your old password (your current password)
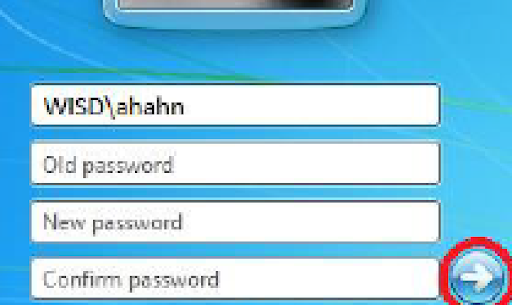 Type in your new password
- Re-type in your new password for confirmation.
- When finished, click on the white arrow in the blue circle (indicated in red below).
You will then get a notification stating your password has been changed. Once you receive this, click “OK” and your normal desktop should appear again.
How do I log in to Google Apps?
- Open a Web Browser.
- Go to gmail.com
- Enter your login ID
- Enter your Password *
*Beginning in September, 2019 Technology will be syncing Google passwords to computer logins. If you change your computer login in September, your Google password will sync to the same password. This will only happen when you change your password.
Do I have to check both accounts?
These two accounts act independently for each other. Unless you forward email from one to the other, you will need to check both regularly.
How can I forward emails from my Gmail account in my Office365 account?
- On your computer, log on to Gmail using the WISD Agency Gmail @washisd.net account you want to forward messages from.
- In the top right, click Settings .
- Click See All Settings.
- Click the Forwarding and POP/IMAP tab.
- In the "Forwarding" section, click Add a forwarding address.
- Enter the email address you want to forward messages to. (WISD Office 365 washtenawisd.org account)
- Click Next > Proceed > OK.
- A verification message will be sent to that address. Click the verification link in that message.
- Go back to the settings page for the Gmail account you want to forward messages from, and refresh your browser.
- Click the Forwarding and POP/IMAP tab.
- In the "Forwarding" section, select Forward a copy of incoming mail to.
- Choose what you want to happen with the Gmail copy of your emails.
- At the bottom of the page, click Save Changes.
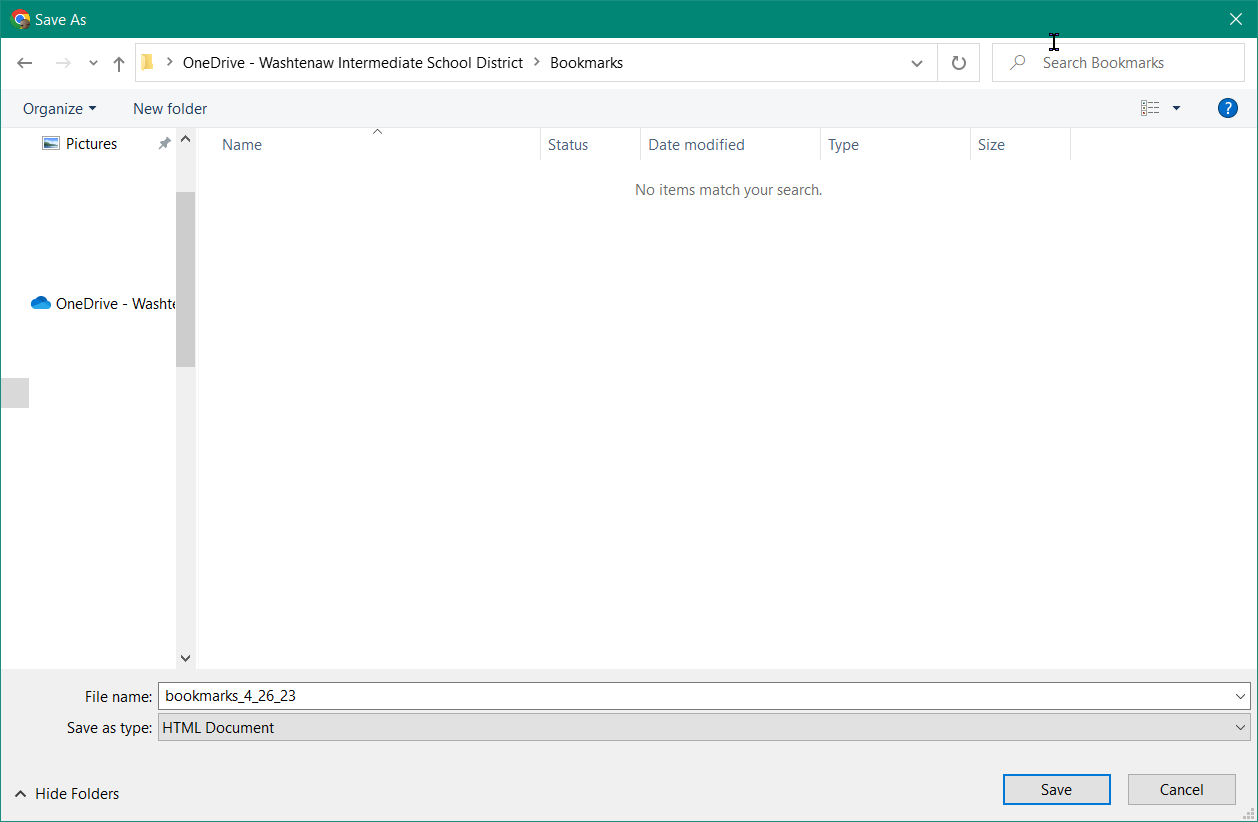
Export & Import Internet Browser Bookmarks
Export/Import Bookmarks from Chrome and Firefox
How to Export Bookmarks from Chrome:
- Open Google Chrome and from the Chrome's menu
 choose Bookmarks -> Bookmark manager.
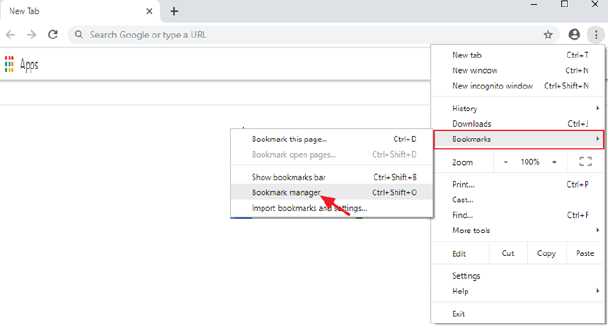
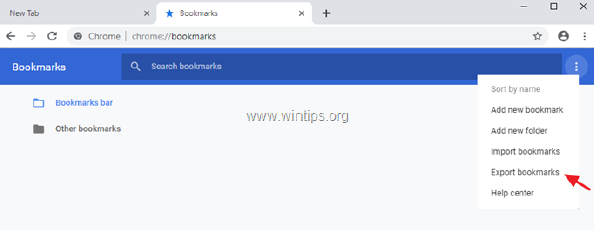
- Then click at (2nd) three dots menu at the top right, and select Export bookmarks.
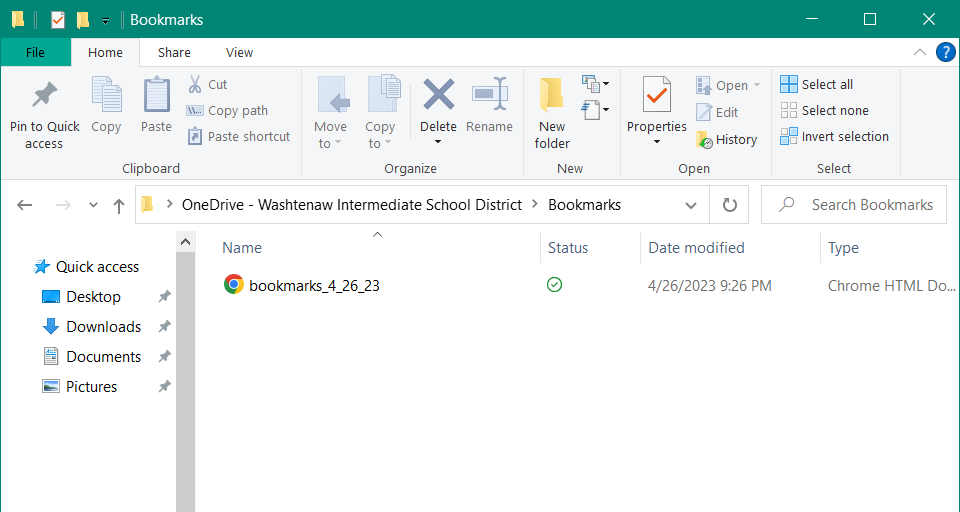
- Type a name for the exported Bookmarks file and Save the HTML file to your OneDrive folder.
How to Import Bookmarks from Chrome:
- Open Google Chrome and from Chrome's menu choose .Bookmarks -> Bookmark manager.
- Then click on the menu (3 dots) at the top right, and select Import bookmarks.
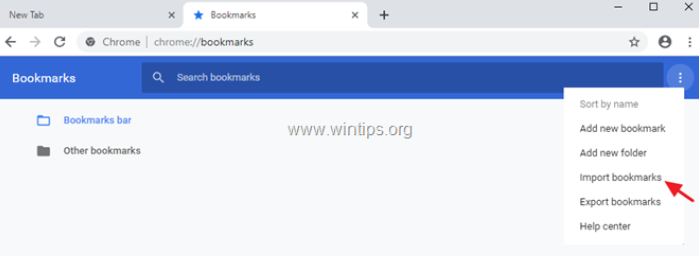
- Select the bookmarks HTML file from backup, and click Open.
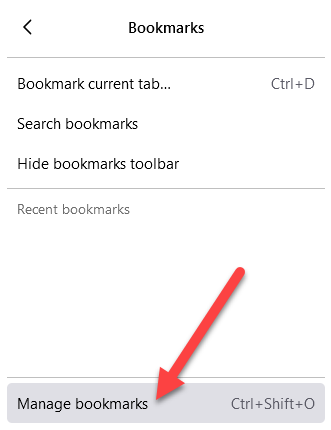
How to Export Bookmarks from Firefox:
- Click on the menu
 on the top right, and select Bookmarks.
- Scroll to the bottom of the menu window and click Manage Bookmarks.
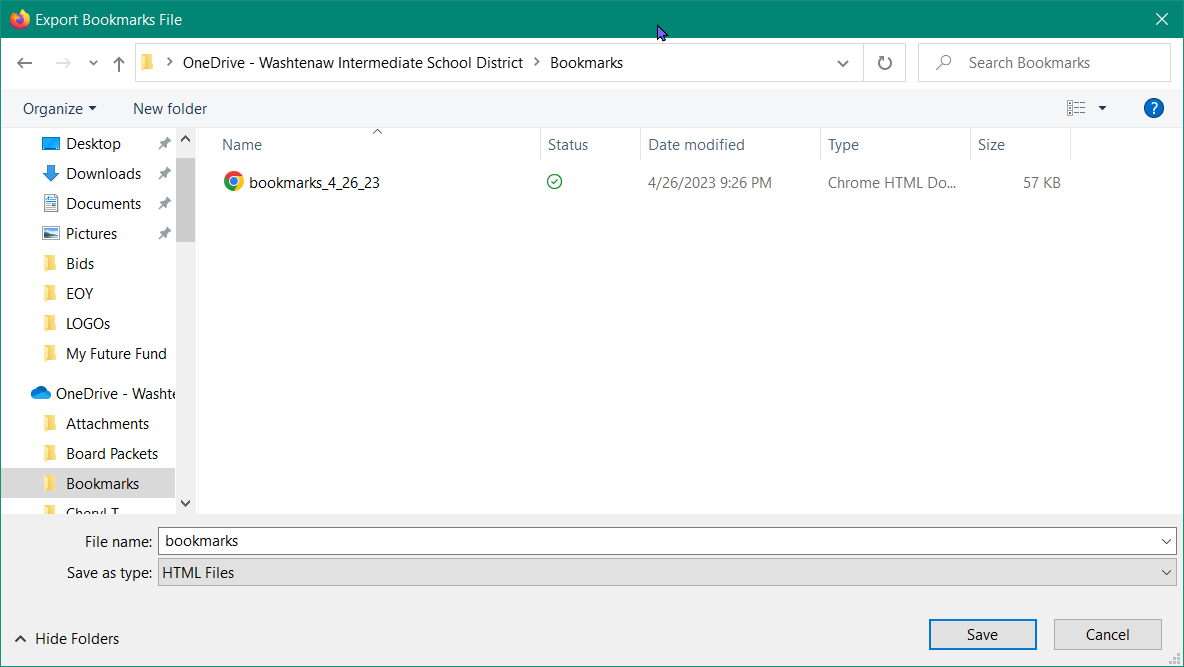
- Click on the Import and Backup button, and then select Export Bookmarks to HTML.
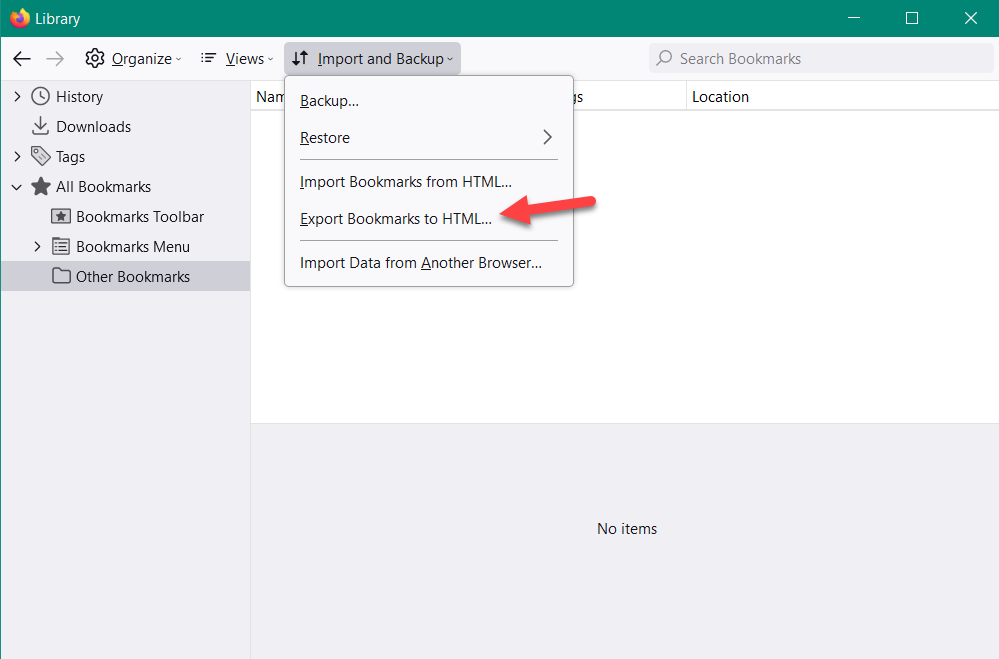
- In the Export Bookmarks File window that opens, select your OneDrive folder and click save.
How to Import Bookmarks from Firefox:
- Click on the menu on the top right, and select Bookmarks.
- Scroll to the bottom of the menu window and click Manage Bookmarks.
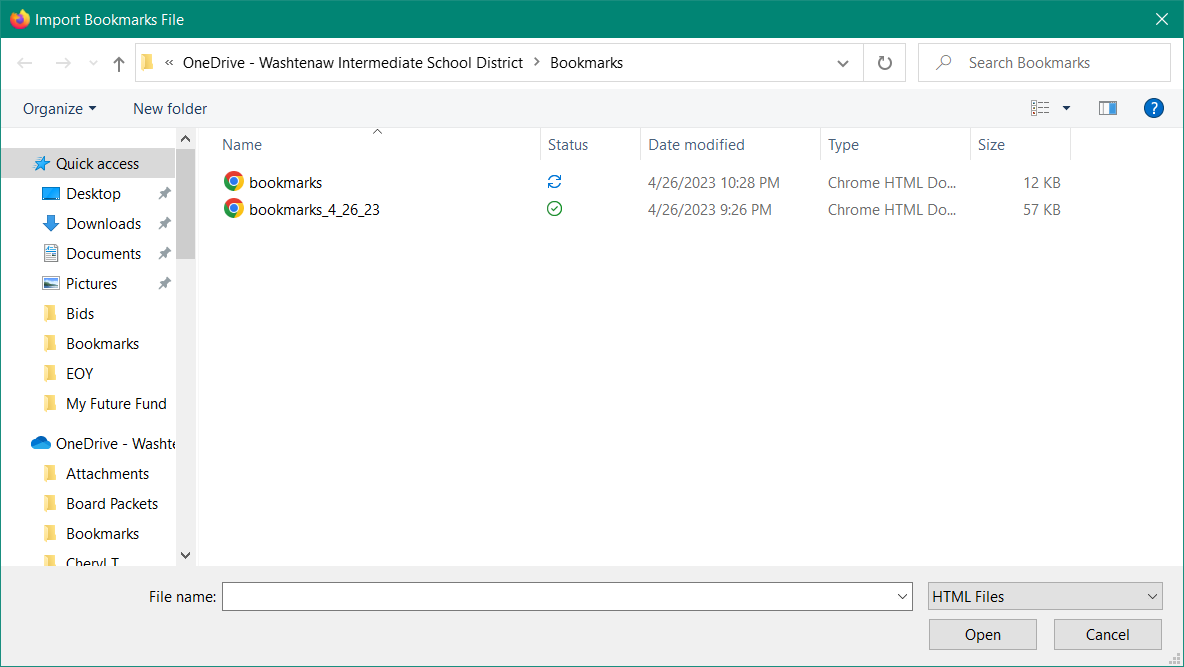
- Click on the Import and Backup button, and then select Import Bookmarks from HTML.
- In the Import Bookmarks File window that opens, select the OneDrive folder where you saved your Exported Bookmarks, click your bookmark file and click Open.
Installing FindTime in Outlook
- Open Outlook for the web in your browser.
- Select New message to open a new email.
-
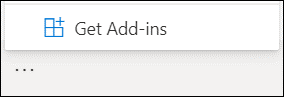
To the right of the Send and Discard buttons, select the ellipses button (…) and then select Get Add-ins.
-
Search for the FindTime add-in.
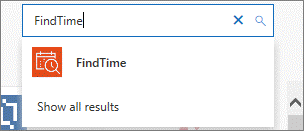
-
Select Add.
-
You will now see the FindTime Reply with Meeting Poll in the Home tab in Outlook.
Microsoft Install FindTime instructions.
Create a scheduling poll with FindTime
Using the Desktop version of Outlook
- Create a new email or select an email to reply to.
- List people required for the meeting in To and optional participants in Cc.
- In the Home tab select Reply with meeting poll or New Meeting Poll. You may have to select the three dots (More commands) in the ribbon and look under Findtime.

- Select the meeting settings.
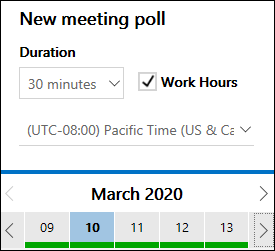
- FindTime looks through the attendees' schedules (if available) and suggests suitable meeting times. Select a few suitable meeting times.
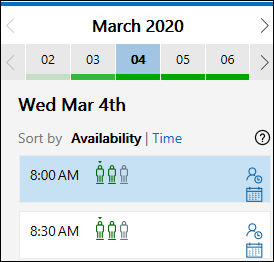
- Select Next.
- Enter the meeting location.
- Select Poll settings and toggle the ON/OFF options.
- Select Insert to email.
- FindTime inserts the suggested meeting times into your email. Select Edit Options to change the meeting settings, if necessary.
- Select Send to send the meeting invites and start the voting process. You will receive a direct link to the voting page for your meeting.
Using Outlook on the Web
- Findtime can also be used in Outlook Web by clicking the three dots while composing an email.

- Select Scheduling Poll from the options and follow the same process to send a poll.
Microsoft How to Create a Poll instructions.
Logging into the WISD Technology Ticketing System
The WISD ManageEngine Ticketing System link can be found on the WISD website under the staff section, or can be reached at the following link:
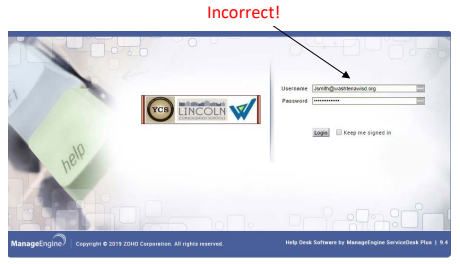
You will be asked to login to the ticketing system using your username and password.
IMPORTANT! Use only your username, not your full email address in the username field. If you log in using your full email address as the username you will not be given a template to enter a ticket. Your password will be your Active Directory password (the same password you use to log in to Windows or your Outlook email).

After successfully logging in to the ticketing system, you will see a template option. Use this template to enter a helpdesk ticket.
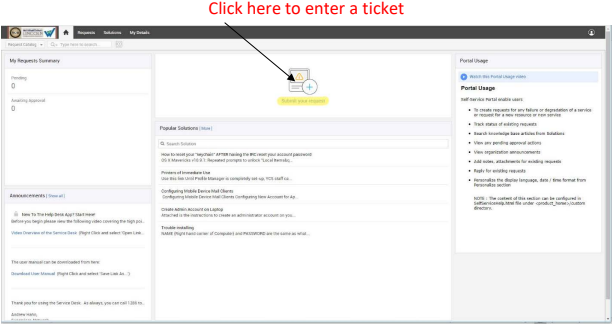 The template will be a little different for each person, depending on where you work at the WISD. If you need additional help filling out a ticket or have any questions, please contact the WISD helpdesk at (734) 994-8100 x1286.
How to Update/Reset your Windows Password
The following steps will change your Windows password. Your Windows password change will be impact the following services:
- Your desktop/laptop login
- Your Outlook e-mail login.
- Your Office 365 login
- Your ManageEngine (technology ticket) login
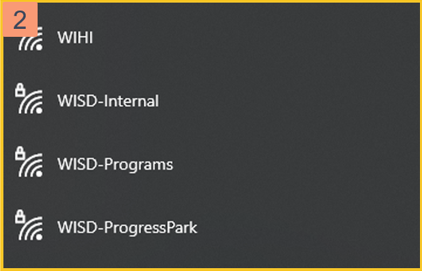
- Internal wireless network “WISD-Internal”
STEPS
1. You MUST be on the Internal WISD network.
2. Press the CTRL, ALT DELETE keys on your keyboard at the same time.
3. Your Windows background will change and you will be presented with a few options. Please click on “Change a Password....”
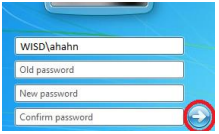
4. You will then be prompted to type in your old password (your current password)
- Type in your new password
- Re-type in your new password for confirmation.
- Your username should automatically populate in the top field, as shown below. If it doesn’t, please type in WISD\your username
5. When finished, click on the white arrow in the blue circle (indicated in red below).
6. You will then get a notification stating your password has been changed. Once you receive this, click “OK” and your normal desktop should appear again.

7. If you have any questions or concerns, please feel free to contact the IT Helpdesk at x1286.
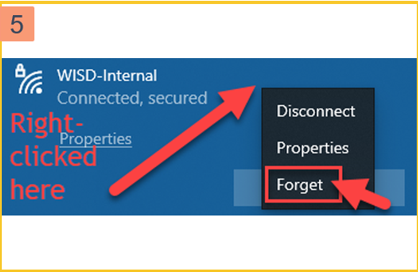
Connecting to WIFI
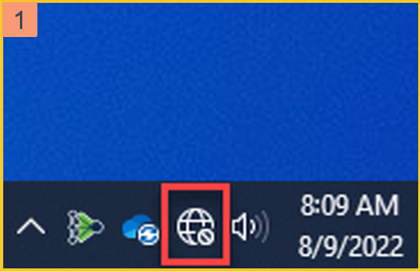
If your device is not connected to any networks, navigate to the globe icon in the bottom right of your screen.
Select a network from the list and press connect. Some networks may prompt for additional steps.
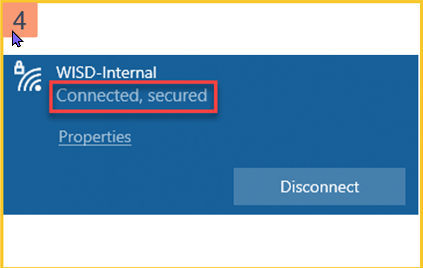
To connect to the internal network, check the highlighted box when prompted for a username/password and Windows will automatically enter your credentials. Alternatively, enter your WISD login info. (The same you used to log onto the device.)

If the following text appears under the network name, your device has connected to the network.
If the connection was not successful, right click anywhere in the blue box, click Forget, and repeat the process. Forget may also be used if your device is on the wrong network.
Instashare 2 Quick Connect Guide
Launching InstaShare 2 on the display
Follow either way to access InstaShare 2 on the display:
- On the IFP main interface, select Wireless Projection > InstaShare 2
- Click Apps
 > InstaShare 2
  to launch the software
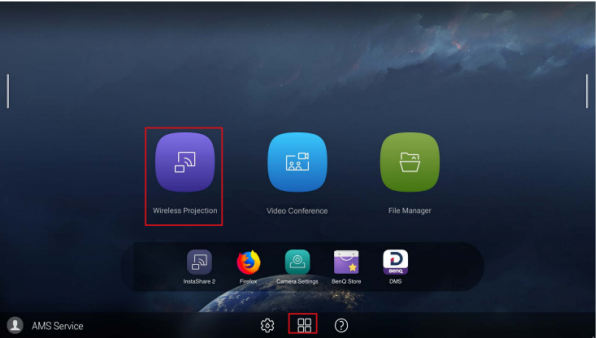
Select InstaShare on the BenQ using one of the methods listed above
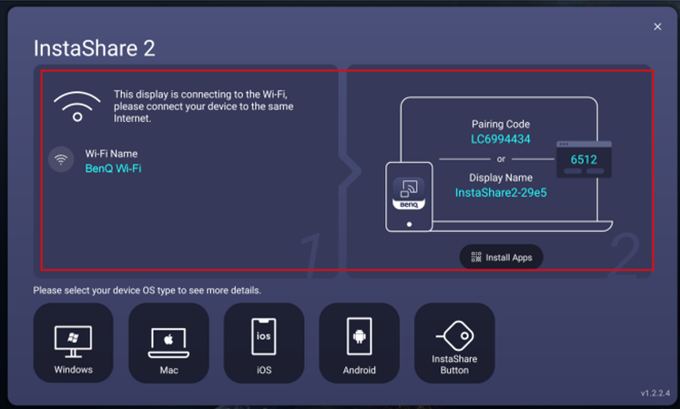
Retrieve pairing code from BenQ once InstaShare launches
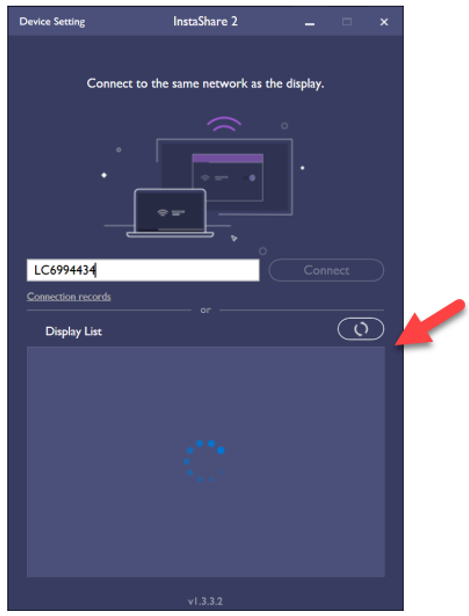
Launch InstaShare 2 on your device that is connected to the same network as the BenQ, enter the code into the window, and click "Connect"
Meeting Owl Pro Setup
Determine the best location for your Owl:

Place your Meeting Owl Pro on the conference table as described in the pic to the left.
A. In a small huddle room that fits two to four people, place the Owl in the center of the table, at least 12 inches from the TV.
B. If you're meeting in a larger conference room (up to 15 feet by 20 feet), place the Owl in the center of the table. It should be at least three feet from the TV, but no more than eight feet from the farthest participant.
C. In classrooms, the Meeting Owl Pro can be placed on a desk at the front of the room. The Owl can also be mounted to a tripod and positioned in the center of the room for an equalized learning experience.
Connect to the Owl:

Turn the Owl over and plug in the USB cable and power adapter. Then, connect the Meeting Owl Pro to an in-room computer or laptop via USB and plug the Owl into power.
Start Your Meeting and Setup Audio/Video
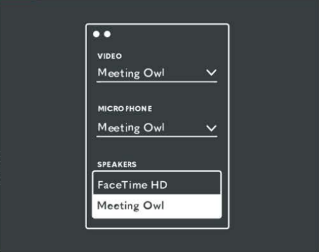
Start your video conferencing platform and choose the Meeting Owl for audio and video.
**Zoom does this automatically if the Owl is plugged into your computer.
The Meeting Owl Pro works with video conferencing software like Zoom, GoToMeeting, Skype, Cisco WebEx, and more. Here's a full list of compatible video conferencing software options.
- WebEx by Cisco
- Google Hangouts
- Google Meet
- GoToMeeting
- Microsoft Teams
- Skype
- Skype for Business
- Zoom
Using Software Center
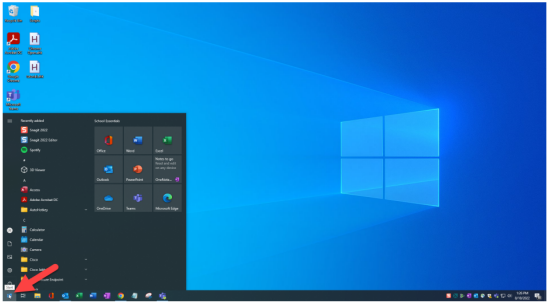 Click the Windows button on the bottom left of your screen - this will open the Start Menu.
 Type "Software Center" with the Windows Start Menu open. Then click Software Center in the list that appears. This will open the application.
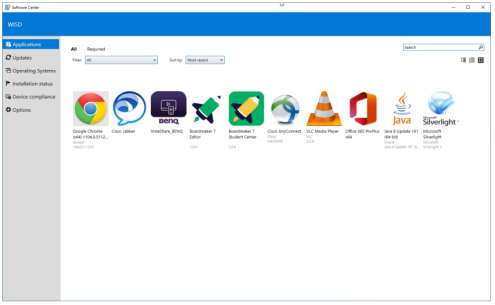 Once Software Center is open, you will see a list of available applications you can install and use. Choose whichever one you need from the list.
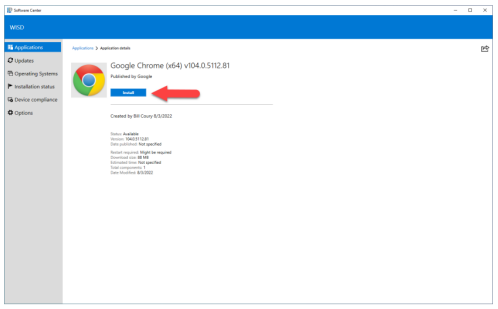 After you have selected an application, simply click the install button to install the application. Once the installation is complete, a shortcut will appear on your desktop.
Windows License Expired
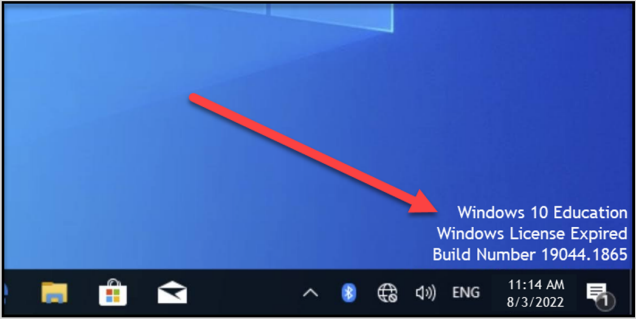
Your WISD issued Windows device needs to check in to the WISD network every six months to renew the Windows license. The best course of action is to bring the device to the TLC and login on the wireless network (WISD-Internal). When the device checks in to the network, it will renew the license automatically and the message will disappear.
It should only take a minute or two for the license to renew and the message to disappear. After that you will be good for at least another 6 months.
If you have any questions, please call the WISD Tech department (734) 994-8100 x1286.
Technology Equipment & Supplies
Damaged or Broken Devices
We understand that sometimes accidents happen. There are a few simple steps you can take if your or a student’s equipment is damaged or broken beyond repair. Read below for instructions.
- Login to our HelpDesk and submit a ticket with the Technology Department.
- Provide as much information about the device’s condition as you’re able.
- Provide the WISD asset tag number or 10-digit barcode number, if you can locate.
- Provide the serial number, if you can locate it.
- If you think you need a loaner device, please let us know in the ticket.
- A technician will respond and send you a link to schedule a device drop-off appointment.
- Once the technician receives the device, he/she will determine if the device can be repaired or replaced and will notify your supervisor for approval of any costs.
- When your repaired or replaced device is ready for pick up, the technician will send you a link to schedule a pick-up appointment (remember to return any loaner device you may have!)
Lost or Stolen Devices
MY EQUIPMENT WAS LOST OR STOLEN - WHAT SHOULD I DO?
There are 2 critical steps to take should your WISD-issued equipment become lost or stolen:
- File a report with local police. If they locate the device, they will call the WISD to retrieve it.
- Click here to submit a HelpDesk ticket with the Technology Dept or call us at (734) 994-8100 ext. 1286.
- Provide as much information about the device as you are able, including the device type (laptop, iPad, etc.), asset tag number, and so on.
- Provide a copy of the police report and/or the case number.
Letting the police and your Tech Dept. know about lost or stolen equipment allows us to take important security measures to protect any sensitive or confidential information on your device. Let us know about the incident as soon as you become aware that the item is missing.
Equipment, Software & Supplies
TECHNOLOGY EQUIPMENT & SOFTWARE
The Tech Dept. will handle the purchase and configuration of most technology requests, such as:
- Desktop computers
- Laptops
- Monitors
- Phones
- Software purchases and installations
SUPPLIES
Some items fall into a different category called ‘supplies,’ which are items that are considered supportive to or enhancing of the equipment listed above. These are items that do not need to be purchased by the Tech Dept on equipment accounts. Some examples of supplies are:
- Screen protectors
- Cases
- Bags
- Keyboards
- Mice
- Speakers
ORDERING SUPPLIES
If your tech request falls into the ‘supply’ category, please see your direct supervisor and department OP for support.
The Tech Dept. also keeps some of these items in stock, like keyboards, mice, and speakers, so feel free to check in with us!
If you would like to request a quote for a specific supply item or need help choosing a supply item, please call ext. 1286 or submit a HelpDesk ticket and we’ll gladly do our best to aid in your decision-making.
WISD Technology Replacement Program
The goal of the WISD Technology Replacement Program is to provide staff and students with the most current technology possible while balancing this with a responsible, cost-effective strategy to get the most out of the available technology funding.
Currently, all WISD issued desktops and laptops are on a 5-year replacement cycle. The replacement date is determined by the fiscal year in which a device was initially purchased. Staff and classroom equipment is reviewed and audited yearly for the upcoming replacement cycle to determine eligibility for updates, replacement, or redeployment. Staff and classroom equipment is reviewed and audited yearly for the upcoming replacement cycle to determine eligibility for updates, replacement or re-deployment. We include any laptop or desktop due for replacement in the fiscal year budget starting 7/1 of the replacement year.
We will be adding other devices, such as iPads, Chromebooks, Projectors and Interactive Displays to our replacement cycle in the future. The replacement cycle timeline for these devices is yet to be determined.
Off Cycle Replacement Requests:
Equipment requests outside the normal replacement cycle requiring replacement or repair should be submitted through the Technology Purchase Form in Script for review by Department supervisors and appropriate Technology Department staff.
Printing
Add a WISD Printer
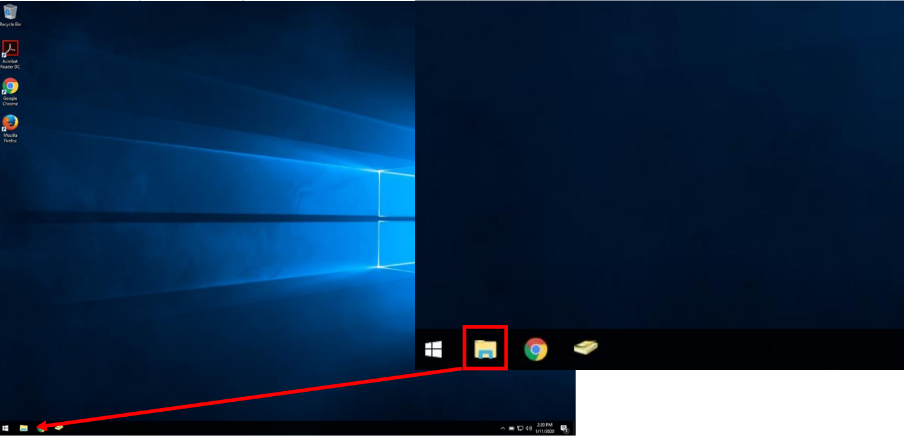
1. From the desktop select file explorer from the taskbar.
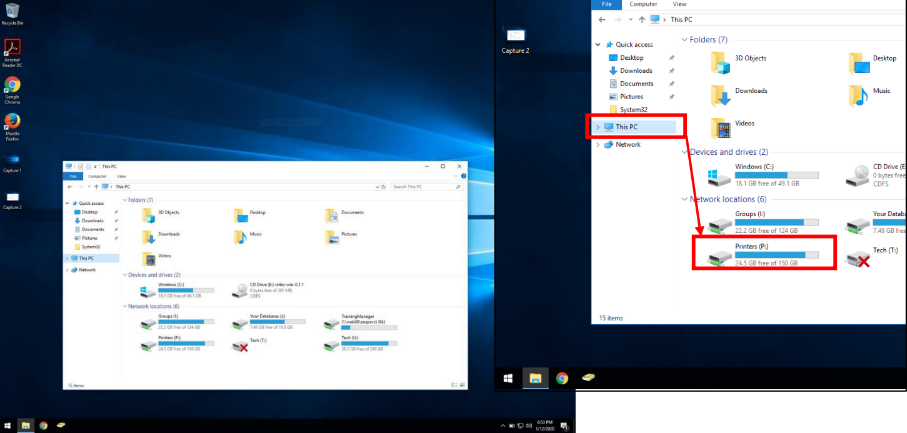
2. Locate and select "This PC" on the left-hand side and open the P: drive near the bottom. (You must be on the WISD network to access this location)
3. Double-click your printer from the available list. Each printer takes, at most, a minute to install.
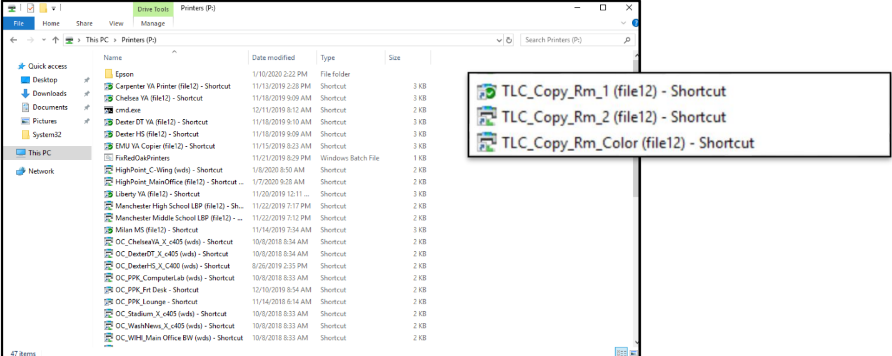
Please note some printers might not be available in this drive.
Please call x1286 if you need additional help or have questions.
Applied Imaging printing and repair service
WISD outsources most printer services to Applied Imaging.
This allows a faster turnaround time for:
- Printer repair
- Toner replacement
- Waste removal and recycling
- General service calls
SUBMITTING SERVICE & SUPPLY REQUESTS
For service or supplies on all WISD-owned copiers and desktop printers, please: (877) 509-0770
Or email Applied Imaging
Provide the 5-digit ID number on the tag:

**Please also feel free to report broken equipment to Tech staff by calling us at (734) 994-8100 ext. 1286. We can report the issue to Applied Imaging on your behalf.**
REQUESTING NEW EQUIPMENT
Click here to start your request for a quote or information for a new printer or copier.
Tech Dept. staff might have a few follow up questions! We’ll need to discuss your printing needs and environment to get a better idea of what equipment will be the best fit and if any other work is required to put a printer in place.